 by Anthony Barragan
Hello again my fellow Apex Insiders. This article is going to be about my win at the 2023 Majestix Invitational and how my team works. This time around we played a total of 9 games of 300 points Bronze Age over the course of 2 days with a total of 25 people earning their way into the coveted championship picture. Going into the tournament I was unsure what record would still make the cut nor did I know how many people were going to be in the tournament, so I had the mindset that I could only lose 1 game with my safety net being a first round Bye. Had I realized that there would be a couple of high scoring 3-2’s in the cut I would’ve been a bit more relaxed.
Wendigo Bomb V.3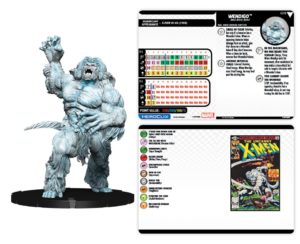
Mystical theme +4
Blackheart W/Spin and Influence Rings 60
Iron Inquisitor 50
Ka-Zar W/Space Gem 60
Tri-Sentinel 30
Scott Porter (White Shirt) W/Sinestro Corps. Ring 25
Scott Porter (Black Shirt) W/Zero Ring 30
Wendigo 15
Wendigo 15
Wendigo 15
Tarots: The Star, 5 of Pentacles, Page of Swords, 3 of Swords. Knight of Cups, and 2 of Wands
Maps: Daily Bugle Press Room, Wakanda, Hunter’s Jungle
Sideline: Chthon, Ghost Goblin, King Killmonger, Scrappy-Doo, The Destroyer, and Search For Ammut’s Tomb
Objects: Mound, Anchor, and Steel Mesh Fencin
WoV Blackheart
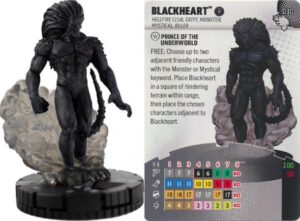
This guy’s trait “Prince Of The Underworld” allows him to be placed in a square of hindering terrain within range FOR FREE, then bring along up to 2 friendly characters with the monster or mystical keyword. This essentially allows him to do a huge 3 person TK with any member of this team’s main force. This couples nicely with his second trait “Brimstone” which lets him generate a fire smoke terrain marker (Smoke terrain is a kind of hindering terrain.) within range at the beginning of the turn, thus allowing him to “port” around the map with ease even if your opponent takes you to a map with little hindering terrain, he also has stealth. So far this guy is just transportation, but what if I told you he also has empower for whoever he brings and has pulse wave to not only reset those pesky durations but also deal minimal damage to many people, Setting them up like a volleyball.
Spin Ring
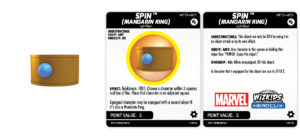
This piece of equipment is 1 half of utility incarnate as it not only gives the bearer telekinesis but also gives “FREE: Choose a character within 3 squares and line of fire. Place that character in an adjacent square.” which is essential to pull people away from defend shells. From pulling the new Ghost Rider away from those he protects to creating stragglers from a character’s high defend the utility never stops. A great bit of tech with this a lot of my opponents didn’t know is that multi-base characters can effectively “swing” their base as they only need to occupy a square adjacent to their original, essentially turning the spin ring’s placement into a pseudo Sidestep.
Influence Ring
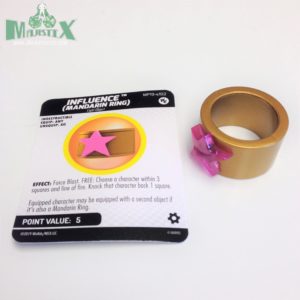
The other half of utility incarnate as it gives force blast and “FREE: Choose a character within 3 squares and line of fire. Knock that character back 1 square.” which combines nicely with the Spin ring to place a character in a more desirable position then knock them back regardless of if it is to reposition a friendly character or passively damage an opposing character. The force blast combines almost too well with Blackheart’s pulse wave allowing him to deal more damage (By dealing knockback damage.) and further disorienting your opponent’s positioning.
Iron Inquisitor
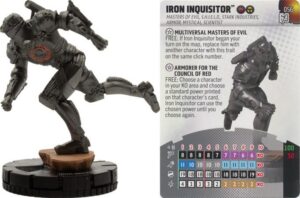
This fella and his fellow Masters Of Evil are an exceptional “swiss army knife” of support/offense/defense. They have a shared trait called “Multiversal Masters Of Evil” which lets them do a Free action to swap to another person with said trait. This guy in specific does 4 really important things for the team, 1 is that he is an incredible support figure as he has a special power called “The Stark Name Must Live On” which is perplex, but when it’s used on another friendly character they can use probability control until your next turn. Reason number 2 is that he brings the S.H.I.E.L.D. team ability which is important for Blackheart as it passively increases the range of adjacent friendly characters by 1. Reason 3 is his immaculate ability to pick up slack when absolutely needed by using his second trait “Armorer For The Council Of Red” which allows him to pick a displayed standard power off of a card of a KO’d friendly character and he can use that power until he chooses another power. Finally reason number 4 is his special defense power “Deal With The Devil” which is not only impervious but also allows him to reduce penetrating damage and gives adjacent friendly characters mastermind, but only to choose friendly characters with the Masters Of Evil keyword, making him able to take shots meant for more threatening members of the team. He also brings the Masters Of Evil team ability to the table which when adjacent to a friendly character making a close attack if the target is also adjacent to the person with the team ability then the target gets minus 1 defense, further applying use for the team passively.
Ka-Zar
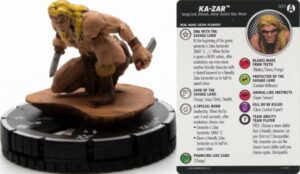
This guy wasn’t a part of the original team, but quickly became an essential member replacing the XMRF Blackheart. The shoes this guy has to fill are being a good tertiary attacker and being a hard to KO leadership figure, both of which he does with his special speed power “Lord Of The Savage Land” which is charge, leap/climb, and stealth. The stealth combined with his combat reflexes makes him tough to shoot and really tough to punch. Now let’s get into the deciding factor as to why this guy replaced XMRF Blackheart, his trait “One With The Savage Land” says when he is given a MOVE action, after resolutions you may move another friendly character with a shared keyword up to half of its speed value and with this being a theme team you can move ANY member of the main force, plus some of the sideline, in addition to moving Ka-Zar allowing better offenses and repositioning. His wildcard team ability lets him bring extra utility between S.H.I.E.L.D. bumping Blackheart and the Porters and using Masters Of Evil to bridge the gap between friendly attacks and opposing defense.
Space Gem
This is on Ka-Zar for 2 reasons, it gives him the ability to carry up to 2 friendly characters and it also gives him phasing/teleport. It also gives him a static plus 1 to speed but that’s just a bonus. The people he mainly carries around are the 2 Scotts.
Tri-Sentinel
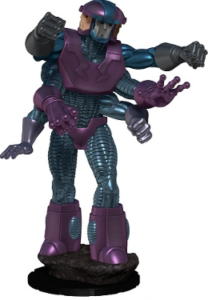
One of this team’s biggest threats is this colossal retaliator who makes opponents rethink not only priority targets but also getting in cheap shots. Its speed power “The Prime Directive” is plasticity, sidestep, and another great bit of tech that reads “when Tri-Sentinel destroys 1 or more pieces of blocking terrain, after resolutions deal 1 penetrating damage to each opposing character that was adjacent to 1 or more destroyed pieces.” which combines nicely with his colossal retaliation power. The colossal retal power “When Nothing Less Than Genocide Will Do” lets you FREE (So long as no one else has activated a colossal retal power this turn.) to pick someone who has attacked Tri-Sentinel or damaged a friendly character then target them with pulse wave, if you did then after resolutions destroy all blocking terrain within 3 squares of Tri-Sentinel. It also has traited energy shield/deflection, improved movement: destroys blocking when you move through it, has a range of 9 with 3 damage (To shoot blocking terrain from afar.), and a STOP click with toughness.
Scott Porter (White Shirt)

This guy is the epitome of “swiss army knife” potential with everything he brings to the table. His trait “Comics Knowledge And Acting Roles” gives him all keywords in the game at all times making him able to perfectly slide into any team and allowing him access to all keyword equipment for free such as the lantern rings, symbiotes, utility belt, and whatever else may be released. His second trait combines perfectly with his first as it gives all friendly characters plus 1 attack at the beginning of the game if he’s on a theme team and plus 1 damage if everyone else is from the same set. He is also another pulse waver but his is a little special because it not only doesn’t target friendly characters (It will still shut off the powers and abilities of friendlies within his pulse wave range.) but also has knockback. All this with only 4 clicks a STOP click on his last click and him only costing 25 points is insane and it truly is an understatement to say he punches way above his weight class. Another wildcard, another set of passive utility, making an already amazing support piece better.
Sinestro Corps Ring

This equipment is usually 10 points but it’s free to assign to characters with the Sinestro Corps. Keyword and fortunately for us Scott Porter (White Shirt) has all keywords so he gets it for free. It gives the user perplex but if they already have it when they use it to negatively modify a combat value they can decrease it by 2 instead of 1. The ring also lets the equipped character generate constructs of the associated color as a POWER action or as a FREE action if they have the corresponding keyword and these things range in utility but there are 4 that are must haves for any ring. The 4 constructs you want are Fire Hydrant to remove annoying hindering terrain markers and/or blocking terrain markers, Stop Sign to barrier out opponents and cancel out any opposing improved movement abilities within 2 squares, Chainsaw for a flurry blades/claws/fangs attack, and Cowboy Boot for the free knockback and giant reach attack with close combat expert.
Scott Porter (Black Shirt)

Much like his white shirt alternate self this guy brings a lot of utility to the table albeit in a different more defensive manner than his white shirt counterpart. You see his trait “Comics Knowledge and Acting Roles” lets him pick any 1 keyword at the beginning of the game then any team ability that a character has on their dial (Friendly or opposing.) and he can use them for the game (I generally chose wildcard or cosmic energy if my opponents had it.), the second half of that trait says that if he is on a theme team you modify the result of the Initiative roll by 1 meaning the theme teams that have this guy modify their roll by a total of plus 4. His second trait “Fight For A Cure” gives him support and allows him to heal ANY friendly character 1 click at the beginning of the turn REGARDLESS of where they are on the map, thus making it easy to keep your people on their good clicks and off their STOP clicks. Trait number 3 “Counting On The Community” is where most of his strength lies as it gives him 3 “Community” tokens if he is on a theme team and these tokens allow him to once per turn reroll ANY roll (So long as no effect says the dice can’t be rerolled.) and remove a “Community” token, meaning he doesn’t need range or line of fire to reroll some important and game changing rolls such as super senses, shape change, blades/claws/fangs, impervious, leadership, support, attack rolls, and breakaway rolls, if nothing bars it from being rerolled this guy is waiting to reroll it. Lastly his special defense power “Family Is Everything” gives him super senses and passively gives all friendly characters that are adjacent to a friendly character that shares a keyword with them plus 1 defense making some nice 18 defenses annoying 19 defenses. All this coupled with his sidestep, TK, and perplex make this guy another 4 click long menace.
Zero Ring
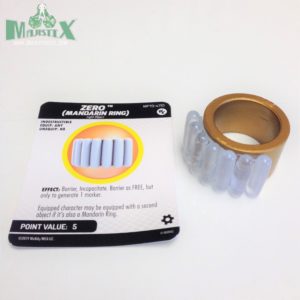
Another bit of utility this time complementing Tri-Sentinel. It gives the wearer incapacitate and barrier allowing scott to protect the exposed members of the team before the wendigos are set loose. It also lets the bearer be given a FREE action to generate 1 barrier marker, which is extremely useful for Tri-Sentinel to get in some extra damage especially when on a map that doesn’t have too much natural blocking terrain.
Wendigo
The team’s primary threat at minimal point cost making him public enemy number 1. His first trait “Smell Of Flesh” gives him sidestep with the caveat of needing at least 1 opposing character to have a “Wounded” token. In order to give an opposing character a wounded token they have to be damaged in an attack and the only way to remove a wounded token is to heal. Trait number 2 “Ancient Mystical Curse” enables him to never be slowed down whilst making sure opponents can’t leave him unchecked. It allows him to use Colossal stamina which is now a retired game mechanic that allows a character to be given a costed action even if it has 2 action tokens but instead of being given a 3rd action token the character takes 1 unavoidable damage immediately after resolutions and doesn’t clear action tokens this turn. It also gives him steal energy and when he uses it he can heal past his starting line, so this 15 point menace can heal to his 300 point starting line (My personal record with this team is going from click 15 to click 7 in 1 turn, healing a total of 8 clicks.) and there’s 3 of this guy on the team so he, much like Scott Porter (White Shirt), can out swing people 6 times his point value. 2 of these guys on click 15 can take down a click 1 Chthon which is nuts that 2 15 point guys can take out a 300 point guy with 4 STOP clicks. His special speed power “In The Mountains, No One Hears You Scream” gives him charge, flurry, and when he ends his movement, after resolutions he can make a close attack but only to target a character with a “wounded” token. This means he can charge/flurry a character and so long as he hits one of his attacks he’ll assign a “wounded” token to the hit character therefore proccing his after resolutions attack and since active player has to resolve all their “after resolutions” effects before their opponents and can even structure the timing of their own triggered effects allowing you to heal after the third attack allowing 3 consecutive attacks (Note: the damage from a critical miss happens immediately after resolutions ,so it can’t be manipulated. So it’s best to save a reroll for the initial 3 attacks as a safety net.) with exploit weakness that can be followed up with another attack that’ll proc off of using sidestep and/or even Ka-Zar’s trait that allows a friendly character to move after he does, giving a single Wendigo 2-5 attacks in a turn. Finally the special defense power “You Cannot Escape The Wendigo” is on click 15 and it’s a STOP click with invulnerability, but you only stop turning the dial if an opposing character has a “wounded” token. This means he’s the perfect person to be ported up the map with Blackheart. The STOP lets him use his defense power during the pulse wave (STOP clicks have Protected: pulse wave, enabling the use of powers/abilities that are a part of the power/ability that gives Protected: pulse wave.) without worry of accidentally critically hitting and subsequently KO’ing your own guys and them being multi-base characters means they also can’t be knocked back.
Chthon
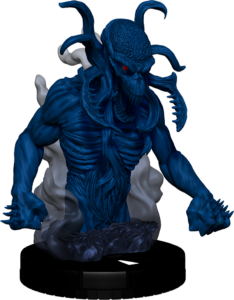
The author of the Darkhold is a very interesting “double-edged sword”. His first trait “Elder God: Demon Of The Darkhold” lets you pick a character with the mystical keyword at the beginning of the game and for the rest of the game that character modifies it’s combat values plus 1 with the tradeoff being whenever they are given an action token they are dealt 1 unavoidable damage. This allows him to bump up anyone on the team but I only ever put him on Blackheart, because the passive buff to range is so important to get the fire smoke marker exactly where you need it. His second trait “PH’NGLUI MGWL’NAFT CHTHON K’LAY WGAH’NAGL FHTAGN” is absolutely terrible and should only be used if you know exactly what you’re doing and are 100% sure you can win by activating it. It lets you bring in Chthon on click 1 after the person you chose for his first trait is KO’d, with the caveat that at the end of your next turn you lose. This means if he is brought out on your opponent’s turn if you can’t win on your turn you lose. This also means if he is brought out on your turn (An example would be being KO’d from mystics, Chthon damage, or crit. missing.) you get 2 turns with this guy (The current turn and the next turn.) which still isn’t ideal but if you have to use it, this is the way.
Ghost Goblin
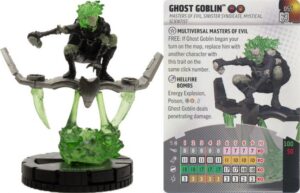
This guy is one of the best M.O.E. swaps and is a formidable tertiary attacker. His purpose as a swappable character is to passively deal damage, be able to clear out swarms, and deal with teams that rely on blocking terrain. He accomplishes the first task with his special attack power “Hellfire Bombs” allowing him to be swapped in to poison dealing penetrating damage and his special damage power “A New Rider To Play With” gives him perplex and outwit, but once per turn when he uses either to target an opposing character after resolutions he may deal 1 damage to an opposing character adjacent to the target. Task 2 and 3 are also completed by “Hellfire Bombs” as it allows energy explosion,improved targeting: destroys blocking, poison, and the ability to have all damage dealt by him be penetrating damage. Thus he clears both swarms and blocking terrain with ease and did I mention he has the mystical keyword?
King Killmonger
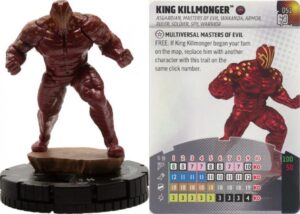
Another one of the best M.O.E. swaps but for an entirely different set of reasons. Kingmonger fills 1 specific purpose with almost brutal efficiency and that is achieved with his trait “Hacking Into Your Pretty Little Pieces”. It gives him willpower and protects him and adjacent friendlies from being hit by opposing characters that are equipped. Whenever he or an adjacent friendly character would be hit by an equipped opposing character you roll a d6 and on a result of 4-6 the attack misses all targets regardless of if they are adjacent to Kingmonger or not and this trait has Protected: pulse wave meaning it’s always going to be a factor when he’s on the map. Now if you add in the fact that Scott Porter (Black Shirt) can reroll a 50% chance to make an opponent’s attack null and void and combine that with the rise in equipment since Scarab’s ban, this guy has taken on Scarab’s mantle in being what keeps equipment in check.
Scrappy-Doo

The role this fierce little puppy fills is to keep tempo after one of my key people are KO’d. His trait “Let Me At ‘Em” has Scrappy come in after a friendly character who shares a keyword with him has been KO’d and his keywords are Mystery Inc., Animal, Celebrity, and Detective. When Scrappy comes in he is on click 3 unless the KO’d character has the Mystery Inc. keyword then he’d come in on click 1. To be honest I usually waited until Scott Porter (White Shirt) was KO’d to bring him in and he wasn’t really attacked all too much. His second trait “Flim-Flam’s Scams And Van Ghoul’s Advice” helps his attacks pack an extra “oomph” by letting you choose between two effects: hit characters can’t be given FREE actions or hit characters gain immobile. His Special defense power “Fearless Pup” gives him toughness and makes it so he takes a maximum of 1 damage from characters with the monster or mystical keyword (Two very popular and common keywords.), all whilst being Protected: outwit. You also can’t go wrong with the combination of his charge, super strength, and his special damage power “Experimental Goggles” which allows him to use both outwit and close combat expert, making him a formidable threat.
The Destroyer
s 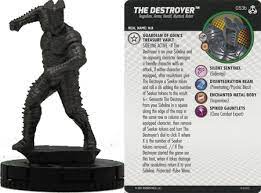
This thing is the looming annoyance many teams don’t want to have to deal with. His trait “Guardian Of Odin’s Treasure Vault” says whenever a friendly character that is equipped takes damage or a friendly character is damaged by an equipped opposing character after resolutions give The Destroyer a “Seeker” token, then roll a d6 and add the number of seeker tokens, if the result is 6 or higher The Destroyer comes in on click “X” where “X” is the number of seeker tokens. Combine this with the fact that equipment is at an all time high since Scarab’s ban and this guy is guaranteed to show at least once or twice per game. The second part of Destroyer’s trait is when Destroyer takes damage AFTER RESOLUTIONS remove him from the map meaning he can be KO’d by opposing characters that can flurry or make additional attacks after resolutions with the tradeoff being his long dial at 10 clicks of life. Some examples of characters that can KO The Destroyer include Sky Tyrant, Wendigo, Shaggy, and Carnage Silver Surfer. Generally click 3 is a scary click to be on if one of the previously aforementioned characters are on the map. Despite the fact that he can be KO’d it’s a challenge and often takes a few dedicated actions. This makes him a great nuisance to many teams as some have to go out of their way just to send him back to the sideline and if they don’t he hits like a truck and can take shots from 10 squares away weakening some in the process or straight up taking down major threats.
The Search For Ammut’s Tomb
This mystical menagerie not only fights in full scale battles but also solves case files in their spare time. This case file card is absolutely nuts and allows characters with either the detective or mystical keyword that are given an action to destroy blocking terrain to put a “clue” token on the case file card, gaining additional effects that culminate to the case files completion. The “Suspect” level is 4 tokens and says whenever a character KO’s an opposing character, after resolutions they heal one click. This one doesn’t help the team too much as it won’t work with the Wendigos and ideally your guys aren’t really getting hurt beyond what Scott Porter (Black Shirt) can heal. The “evidence” level is 6 tokens and says when a friendly character deals damage to an opposing character occupying or adjacent to a debris marker, increase damage dealt by 1. This is where things get silly as it allows for the already great Tri-Sentinel to kick things up to 11 by making his “ping” damage go from 1 penetrating to 2 and making the 1 damage pulse wave into 2. The “case closed” level is 8 tokens and says when a friendly character KO’s an opposing character you score an additional 10 points, further widening the point differential between you and your opponent.
Tarot Cards
*The Star: This tarot turns all ones in attack and breakaway rolls into sixes, making the Wendigos more likely to Crit. hit and saves you from having to worry about crit. misses. It also makes your defensive rolls more likely to succeed and since you can reap the benefits of this card before your opponent the returns aren’t too diminishing. The Star also helps deal with “defend shell” teams and Mr. Sinister teams.
*5 Of Pentacles: This card is pretty simple, it’s just for the plus 2 to speed when using charge, which helps the Wendigos close the gap faster.
*Page Of Swords: Making steal energy heal an additional 1 makes the Wendigos heal 6 clicks on a good turn, taking them from click 15 to click 7. This also helps when dealing with characters that have mystics as you’ll still end up higher rather than stay on the same click.
*3 Of Swords: Making pulse wave a base 2 damage on a team that has 3 versatile pulse waves where two of them also have knockback is amazingly effective. This card was a last minute addition, because there were games where I’d lose all the Wendigos and I needed the remaining guys’ threatening presence to be felt. The damage also adds up quickly when you hit multiple people for 2 or 3, especially if you can do it multiple times.
*Knight Of Cups: Making invulnerability reduce 3 damage instead of 2 makes it harder for my opponents to multi-target and split damage on my Wendigos and Blackheart.
*2 Of Wands: Hit characters have battle fury. This card is amazing with this team as it allows Blackheart to pulsewave the opposing team giving them battle fury making it so they can’t carry each other and they can’t make ranged attacks. The Wendigos get battle fury which will help deal with any shape change and if a Scott Porter (White Shirt) gets hit by pulse wave he can’t pulse wave me back.
Maps
*Daily Bugle Press Room (Indoor): This is the default map I choose if my opponent doesn’t have too much barrier. Barrier is a concern as they could extend for an attack then pull them back and barrier around them making it so my Tri-Sentinel can’t do his colossal retaliation because he wouldn’t be able to draw line of fire to declare the retaliation. The map also lets me get progress on the case file fairly quickly, while using the natural blocking and hindering terrain to my team’s advantage
*Wakanda (Outdoor): This is the map I pick when my opponent has a lot of barrier. There is very little natural blocking terrain and an overabundance of hindering terrain making it one of the easiest maps for Blackheart to port around. The Scott Porter (Black Shirt) defense bump combined with the hindering bonus means if no opposing character can use improved targeting: hindering terrain anytime they shoot one of my guys on average they have a plus 2 to their defense. Since it’s an outdoor map hiding behind barriers doesn’t really help as far as Tri-Sentinel is concerned.
*Hunter’s Jungle: Every team needs at least one big map in order to throw off specific teams. The map itself also has some nice clusters of natural hindering and blocking terrain. The team this map was picked to go against is the animal team that depends on one or two lockjaws. This is also to show my opponents that my team can function on a big map, so just taking me to a big map isn’t a direct counter to the team.
Objects
The anchor is just in case my opponent takes me to a map with little hindering terrain and to bridge gaps in hindering terrain. The steel mesh fencing is for giving 2 Wendigos energy shield/deflection or if my opponent has improved targeting: hindering terrain Blackheart and Iron Inquisitor hide in it that way if they are shot they’d at least have energy/shield deflection since they wouldn’t be able to use their stealth. The mound is some hard to destroy blocking/elevated terrain that I could use to help barrier myself in, but if I didn’t need it I usually just had Tri-Sentinel walk through it to destroy it.
Now that I’ve told you about my team let me tell you about my games and how they went. We played 5 games the first day then, cut to top 4 for the second day. Players who won an I.C.Q. (Invitational Championship Qualifier) level event or higher were given a first round bye with a full 300 points, which I saw as a safety net to allow me to only lose 1 game.
Round 1: A 300 point bye
I used this time to see what cool stuff people were playing and see what I did not want to play against. There was one team I really didn’t want to play against and that was a Nighthawk prime team that would’ve made Blackheart traversing the map really difficult as Nighthawk prime says no opposing characters can increase combat values unless they are adjacent to Nighthawk. The coolest team I saw was Wes Betschart’s team that had Red Son Wonder Woman and BTU prime Wonder Woman.
Round 2: Jonah Weikert (Black Lantern Apoc.) Black Lantern Corps. +4 theme
I won map and we traveled to Wakanda.
Turn 1: He flips the free support tarot and spends his turn healing Apocalypse and Nekron. I flip the 2 Of Wands. All my Wildcards copy the S.H.I.E.L.D. TA before first turn immunity is broken because he has the XRF Mister Sinister that damages opposing characters that use the wildcard TA. I position Blackheart and Iron Inquisitor in front of 2 Wendigos. Then Tri-Sentinel stands in front of Blackheart and Iron Inquisitor to body block them and the Wendigos behind them. Ka-Zar moves carrying the two Scotts, placing them next to Blackheart, allowing Wendigo 3 to move in front of them next to Tri-Sentinel. I perplexed Tri-Sentinel’s defense with the Inquisitor and Wendigo 3’s defense with the two scotts. Lastly Scott (Black Shirt) makes a free barrier to protect him and the other Scott generates a yellow stop sign to barrier around Ka-Zar and friends.
Turn 2: He flips an unimportant card for the turn. Nekron is TK’d by Scott Porter (Black Shirt) and he generates a grave marker in between Tri-Sentinel and Wendigo 3. Black Lantern Batman ports into the grave marker and flurries both Tri-Sentinel and Wendigo. He misses both attacks and then repositions his team forward and barriers so that none of the markers are adjacent to a character. I flip 5 Of Pentacles. Inquisitor perplexes Tri-Sentinel’s attack then he retaliates making sure to catch Batman in the pulse wave. I hit Batman and destroy most of the barriers protecting his team. Wendigo 3 flurries Batman and KO’s him.The Scotts perplex up attack on Wendigo 1 and 2, then Blackheart ports up with his 2 Wendigos and he pulse waves hitting Lyssa Drak, Nekron, Mister Sinister, both stop signs, and both Scotts. Wendigo 1 then charge/flurries Lyssa Drak while carrying Blackheart hitting 2 of 3 attacks and KOing her. Wendigo 2 does the same as Wendigo 1 but targets Nekron. He hits all 3 attacks and KO’s Nekron. Wendigo 1 and 2 both sidestep to get a free attack on Scott Porter (White Shirt), the first hits him to his STOP click and the second KO’s him.
Turn 3: He flips the High Priestess. Apocalypse phases over to punch Blackheart and KO’s him. Mister Sinister shoots a Wendigo back to his STOP click and Scott Porter just chills. On my turn I flip the Knight Of Cups. I have the Wendigo that got shot charge/flurry Mister Sinister KOing him. Time is called and I’m not in prime position to KO Apocalypse so the game ends. I won 190-60.
Round 3: Clay Wood (Kale Caesar) Unthemed
I won map and took Clay to the Daily Bugle Press Room, because this was going to be a game of positioning and mechanics. Due to Clay picking the side with the conference table my team was broken up almost entirely, as there was very little space for a 2×2 character to fit in. This results in 1 Wendigo starting 4 squares up near Clay’s elevated terrain.
Turn 1: He flips 9 Of Wands. He then barriers for free with his Zero ring then Hulk sidesteps through it. Jennifer Kale uses barrier as a power action and sets up more terrain for Hulk to move through, this time while carrying Jennifer Kale and moving into a defensive position nestled in between two elevated terrain markers. Scott Porter (White Shirt) sidesteps next to Kraglin and Mephisto does a costed action to move next to him. Kraglin carries Ghost Rider, Mephisto, Scott Porter, and Ghost Goblin over to Hulk and Jennifer Kale to complete the formation. In the singular open square Scott Porter generates a lasso construct and Ghost Goblin swaps for Iron Inquisitor. On my turn I flip the Page Of Swords. My wildcards copy the S.H.I.E.L.D. team ability. Tri-Sentinel moves through a bunch of blocking terrain in front of Blackheart, because my original idea was to bring him up with Blackheart but the reality of what I was facing was slowly sinking in and I needed to make sure Jennifer Kale was gone. Scott Porter (White Shirt) sidesteps next to Blackheart, Inquisitor then perplexes Blackheart’s attack, and Blackheart ports up seven squares bringing along Wendigo 2 and Scott Porter (White Shirt). Wendigo 1 (The one that started four squares out.) Charges next to Blackheart to get the damage bump from his empower which allows him to destroy the shipping container that’s protecting Clay’s team. Scott sets things off by perplexing his attack and pulse waving the opposition. This KO’s the lasso, puts Mephisto on click 2, Kraglin on click 3, Jennifer Kale on click 3, and doesn’t hurt the rest because of Ghost Rider’s protection. Blackheart follows up with a pulse wave of his own which KO’s Jennifer Kale, puts my Scott Porter on click 2, and puts both Kraglin and Mephisto on their last clicks. I finish things off by making a catcher’s mitt construct next to Scott and Wendigo 2 sidesteps back carrying Blackheart and placing him into some hindering terrain.
Turn 2: He flips King Of Pentacles. Inquisitor swaps for Kingmonger and punches Scott in the face. Scott Porter sidesteps up to generate a Cowboy Boot construct and it knockbacks my Scott KOing him. Hulk charges Wendigo 1 picking up and using the other of his defensive elevated terrain, KOing him. This causes me to bring in Scrappy in one of his squares (I was supposed to do this when Scott was KO’d but I forgot to.) and The Destroyer in his starting area. This makes it so Scott now has to pulse wave to get Scrappy out of the way. His final action is with Ghost Rider who uses hypersonic speed to double target Blackheart and Wendigo 2. After all rerolls he hits only Wendigo 2 sending him to the KO area. I flip the 5 Of Pentacles. Scott Porter (Black Shirt) heals Blackheart back to top click. Inquisitor perplexes Tri-Sentinel’s attack and he retaliates. This puts Kingmonger on click 6 (Because he was adjacent to some blocking terrain.), Hulk on click 2, Scott Porter on click 2, and KO’s both Mephisto and Kraglin. Scott Porter (Black Shirt) sidesteps over to perplex Wendigo 3’s speed. Ka-Zar Phases up carrying Scott allowing Wendigo 3 to catch up to the rest of the team. Blackheart ports into the heart of Clay’s team and Tri-Sentinel leaves the pulse wave range. Blackheart Pulse waves putting Hulk on click 4, Scott on click 3, and Kingmonger on click 7. Wendigo sidesteps up, then charge/flurries Ghost Rider and misses both attacks resulting in me using the third attack to KO Scott Porter.
Turn 3: He flips Three Of Cups. He spends his turn KOing the last Wendigo and time is called. I am not in a position to score points so the game ends. I won 195-70.
Round 4: Nikolas Madison ($$$$) +3 Defenders theme
I won map and decided that Wakanda would be the best place to fight since the last time I played Nik with a variation of this team I took him to the Daily Bugle. I also have to play the team a bit differently as Nik has the Order ATA on his whole team making Wendigo’s consecutive attacks near impossible to pull off.
Turn 1: He flips an unimportant card. He passes his first turn. I flip the 2 Of Wands. Blackheart positions himself and Inquisitor in between two Wendigos. Tri-Sentinel and Wendigo 3 join the formation.
Turn 2: He flips King Of Cups. He has Carnage Surfer 3 TK up Carnage Surfer 4. Carnage Surfer 2 carries up Scott Porter (White Shirt). Carnage Surfer 4 uses hypersonic speed to shoot Zabu. Zabu is KO’d and Carnage Surfer finishes his hypersonic six squares away from Wendigo 3. He then gets an additional attack to shoot Wendigo 3 KOing him. I flip 5 Of Pentacles. Scott Porter (Black Shirt) generates a FREE barrier next to Nik’s Scott Porter. Inquisitor perplexes Tri-Sentinel’s attack and it retaliates. Tri-Sentinel hits Scott to click 3 and Carnage Surfers 2 and 4 to click 3. Blackheart ports up the remaining two Wendigos and he pulse waves hitting Carnage Surfer 4 for 1. Wendigo 2 charge/flurries Carnage Surfer 4 and he shape changes out of it. Wendigo 1 charge/flurries Carnage Surfer 4 and manages to hit 1 attack but misses the second attack. For my final action Ka-Zar moves carrying Scott Porter (Black Shirt) and Inquisitor over to Blackheart and friends to make another defensive formation. Wendigo 1 moves as a result and misses yet another attack on the dreaded Carnage Surfer 4. Inquisitor swaps into Kingmonger.
Turn 3: He flips The Sun. Carnage Surfer 3 hypers up and shoots Tri-Sentinel KOing him, he then shoots Scott Porter (White Shirt) hitting him to his STOP click. Carnage Surfer 3 then spins Wendigo 2 out of formation. Carnage Surfer 2 Hypers up to KO Wendigo 2 and then dual targets Scott Porter (White Shirt) and Wendigo 1. I get my Kingmonger roll saving the lives of many and slowing down the onslaught. Carnage Surfer 4 attempts a hypersonic speed breakaway and fails. I flip The Star. Scott Porter (Black Shirt) heals his alternate self 1 click and then Scott Porter (White Shirt) sidesteps up. He perplexes his attack and pulse waves Carnage Surfer 3 putting him on click 4 by knocking him off some elevation. Time is called and I need to score 60 points to tie. Blackheart ports up and pulse waves Scott Porter, and Carnage Surfer 1, 2, and 3. This KOs Scott, puts Carnage Surfer 1 on click 3, Carnage Surfer 2 on click 2, and Carnage Surfer 3 on click 5. Scott Porter (Black Shirt) then barriers Wendigo 1 away from Carnage Surfer 4 so he doesn’t have to roll breakaway. In a hail mary attempt, Wendigo 1 charge/flurries Carnage Surfer 4 and hits his first attack putting him on click 8. He gets his first free attack for the charge resolving and KOs Carnage Surfer 4. I won 91-60.
Round 5: Kaleb Redick (Better Living Through Science) +4 Scientist theme
This was one hell of a game and was very well played on Kaleb’s part. I’d seriously recommend checking out the stream on the Majestix YouTube channel as it was full of good tech usage and mechanics. The match can be found here: https://www.youtube.com/live/XJmxDeZ3LVM?si=gSZ6ODMVlCdbXwK_ The match begins around the 4 hour mark. Kaleb gave me my only loss for the weekend at 195-235. I went into the cut at 3rd seed with a record of 4-1 at 996 points.
Top 8: Brandon “Squidward” Weber (Kamo Hurt You) +4 Arrako theme
I went into this match with a very specific plan and had to throw it away almost instantly. I won map and took him to Wakanda, because I’m the only one allowed to break blocking terrain at will.
Turn 1: He flips an unimportant tarot. He passes. I flip an unimportant card. My wildcards copy S.H.I.E.L.D. and Blackheart ports up like usual with Iron Inquisitor. Tri-Sentinel and the Wendigos break the map’s natural blocking and Inquisitor swaps for Kingmonger. Ka-Zar carries the Porters and they surround Kingmonger. Instead of having Wendigo 3 body block Blackheart I have Zabu move up the map and end my turn (This was a huge mistake on my part.).
Turn 2: He flips the Queen Of Wands. Kamo generates his shark and activates his FREE action to move it half its speed giving it a free attack targeting Zabu. The shark eats my Zabu. Scott Porter (Black Shirt) then TKs up Kamo. Kamo jumps to the shark before charging then moves adjacent to Blackheart to flurry him and Wendigo 2. Kingmonger saves them with the first roll but the second attack is successful and both Blackheart and Wendigo 2 are KO’d. The rest of his team moves up and gets ready for the oncoming brawl. I flip the 5 Of Pentacles. With Blackheart gone and a very hard to hit Kamo in my face I need to get to his team and ignore the shark god. Scott Porter (Black Shirt) sidesteps up and places a Free barrier in between Apoc and Genesis. Tri-Sentinel retaliates and puts his Scotts on click 2, Pegasus Cap on click 6, and both Apoc and Genesis on their STOP click due to them being adjacent to the barrier marker. Wendigo 3 follows up with a charge/flurry on Apoc missing all 3 attacks due to some great blades roll outs. Scott Porter (White Shirt) pulse waves to get Kamo away from the team putting him on click 3. Wendigo 1 can now charge/flurry his Scotts since Kamo has been pushed away, so he does. He is successful in KOing both Scotts with the use of his 4 attacks. Wendigo 3 sidesteps to both make space for Ka-Zar and friends and get a fourth attack on Apoc missing yet again. Ka-Zar carries Scott Porter (White Shirt) and Kingmonger into position so he can protect Tri-Sentinel and Wendigo 3. The free move is given to Scott Porter (Black Shirt) so he can be a little closer to the team. Scott (White Shirt) then generates a Cowboy Boot to kick Apoc away from the team so he can’t just stand there and flurry next turn.
Turn 3: He flips the same tarot as me and is forced to flip another tarot being 8 Of Cups. His pegasus cap charges the unprotected Wendigo 1 and KOs him. Kamo’s shark gets his free move and attacks Tri-Sentinel, KOing him. Kamo then charge/flurries jumping to the shark and punches Kingmonger knocking him back and away from the team putting him on click 8. This brings out The Destroyer nearby since we were fighting along the map’s edge. The second attack from the flurry misses Ka-Zar (Kamo heals to click 2 because of his steal energy.). The shark charges Wendigo 3 and KOs him. His last action is with Genesis who charge/flurries The Destroyer missing both attacks. I flip the Page Of Swords. With the main part of my offense gone I’m in a rough spot but hope isn’t lost just yet. Scott Porter (White Shirt) perplexes his attack and pulse waves. He puts Pegasus Cap on click 7 and Kamo back on click 3. Kingmonger sidesteps to pick up his Sinestro Corps. Ring and outwits Pegasus Cap’s energy/shield deflection. Kingmonger then chucks the ring at Pegasus Cap, sending him to the KO area. Scott Porter (Black Shirt) uses his free and costed barrier to surround Kamo (I thought this would stop him from generating the shark but it doesn’t because it’s a non-optional effect and must always happen if the requirements are met.). My last action is to have The Destroyer shoot Genesis, but she gets her super senses roll.
Turn 4: He flips Ace Of Swords. Since Kamo is surrounded by barriers and the shark HAS to be generated the active player gets to place them in the nearest possible square. Kamo Jumps to the shark and then charge/flurries Ka-Zar missing both attacks. The shark gets its free move to attack Scott Porter (Black Shirt) but he gets his super sense roll. The shark attacks him again but the result is the same. Time is called and Genesis flurries The Destroyer. The first attack is a crit miss and the second is a regular miss, so she KOs herself. Apoc then phases up to attack Kingmonger but he succeeds in his roll out. I’m up on points so there is no reason to play any further, I won 140-135.
Top 4: Kevin “Mr. Magoo” Afrooz (Fire & Brimstone) +3 Mystical theme
This is my first time losing the initiative roll and he chooses to take us to a Construction Site. This match was also streamed and can be watched here: https://www.youtube.com/watch?v=QYs9ofpVSKE&t=10950s it starts around the 1:20 mark.
Turn 1: I flip the 3 Of Swords. My wildcards copy S.H.I.E.L.D. and I port Blackheart and Inquisitor up to my Wendigos like usual. Tri-Sentinel shoots and destroys the Joker’s gas can. I swap Inquisitor for Kingmonger since his entire team is equipped and pass turn. He flips the High Priestess and moves his entire team up the map near his elevated terrain.
Turn 2: I flip 2 Of Wands. Kingmonger swaps for Inquisitor and perplexes Blackheart’s attack. Blackheart ports into his fire smoke marker and brings his Wendigos placing them behind him. Scott Porter (Black Shirt) sidesteps up and uses TK to destroy the elevated terrain blocking Blackheart’s line of fire to Ghost Rider. Blackheart uses the Spin ring to displace his Ghost Rider separating him from the rest of his team. Blackheart then pulse waves hitting Arachknight to click 3, Blackheart to click 6, Wonder Woman to click 6, and Scott Porter (White Shirt) to click 3 (This gives his whole team and 2 of my Wendigos battle fury.). This brings out his Destroyer in his starting area. Wendigo 2 charge/flurries Ghost Rider and KOs him with his three attacks. Wendigo 1 charge/flurries his Blackheart and KOs him with the first attack. His second attack is directed at Blade who is also KO’d. His third attack targets Scott and puts him on his STOP click. Wendigo 2 sidesteps to get a free attack on Scott to finish him off. Wendigo 1 sidesteps to attempt to hit Wonder Woman and is successful in putting her on her STOP click. He flips 10 Of Pentacles. His Destroyer hits Wendigo 1 to his STOP click. Arachknight uses hypersonic speed to KO Wendigo 1 and retreats next to The Destroyer. Wonder Woman walks over to them so she can use her special defend on them.
Turn 3: I flip 5 Of Pentacles. Ka-Zar moves up the map carrying the Scotts so Black Shirt can make a free barrier in between his three guys. Inquisitor perplexes Tri-Sentinel’s range so it can sidestep up and shoot Scott Porter’s free barrier which KO’s Wonder Woman (Forcing her to revive herself, he rolled a 5 so she heals 3 above her STOP click.), puts Arachknight back on his STOP click and gets rid of The Destroyer. Blackheart uses Spin ring to get Wendigo 3 adjacent to him and then ports up closer to Wonder Woman and Arachknight. Scott Porter (Black Shirt) sidesteps away to make room for Wendigo 3 to move in. Wendigo 3 charge/flurries Arachknight and eventually KOs him. Time is called and I have Wendigo 2 charge/flurry Wonder Woman, but he misses both of his attacks. With only 1 figure vs. my whole team Kevin can’t win, so I take the W 226-15.
Finals: Raybikem “Ray” Olvera (The Dead Shall Rise) Unthemed
I won map and knew from facing many other iterations of the Black Lanterns that I had to take him to a small outdoor map, so I took him to Wakanda. This match was streamed at the same link as above, but the match starts at the 2:46 mark.
Turn 1: He flips the 3 Of Wands. He spends his turn healing Apoc and Nekron. He also has Sakaarian Iron Man pick up his objects. I flip 2 Of Wands. I do my usual defensive set-up, making sure to keep Zabu back so he isn’t an easy KO. Inquisitor swaps for Kingmonger because most of his attackers are equipped.
Turn 2: He flips Strength. Sakky picks hypersonic speed and precision strike. Sakky sidesteps up and then hypersonics across the map to KO the unprotected Wendigo 3. I bring in my Destroyer in the opposite corner of his starting area. Apoc phases to slash at my Destroyer and is successful hitting him for seven damage. He could’ve KO’d my Destroyer but didn’t remember that he picked Skybreaker with Apoc, which would allow him to shoot The Destroyer for six penetrating damage. Since he didn’t do the additional attack my Destroyer lives to fight another day and the rest of his team repositions into a corner of the map. He barriers around his team making sure to space the barriers away from his team. I flip The Star. After a lot of planning I decide my best course of action is to just deal with Sakky. Scott Porter (White Shirt) sets things off with a pulse wave putting Sakky on click 3 and generating War Machine from his sideline on click 4. I can get big points in this turn, but things need to be done with surgical precision. War Machine has a trait where when he would take damage he is removed from the game and 10 points are scored instead. The thing is this trait isn’t Protected: pulse wave, which means if he is pulse waved he stays on the map. This means if he is KO’d by a pulse wave his full points are scored which is a whopping 95 points. Tri-Sentinel retaliates which puts Sakky on click 4, War Machine on click 5, and KOing my Zabu. Scott Porter (White Shirt) perplexes Blackheart’s range down, so when he pulse waves I won’t catch my team in the pulsewave. Blackheart ports as close to the map edge as possible and does his pulse wave. He hits KOing War Machine and puts Sakky on 7. Wendigo 1 charge/flurries to finish off Sakky. He has Sakky remove his objects with each hit (When he would be dealt damage from an attack he may remove one of his objects to instead take one unavoidable damage.), so that Wendigo doesn’t deal him damage making it so he can’t heal with steal energy. For my last action Tri-Sentinel carries Blackheart back into position.
Turn 3: He flips 8 Of Cups. Apoc phases up to attack Wendigo 1. Since no one has any wounded tokens he is KO’d. He repeats the barrier set up from before and ends his turn. I flip the Knight Of Cups. Tri-Sentinel retaliates, hits his whole team and destroys most of his barriers. Blackheart ports up with Wendigo and Scott Porter (White Shirt). Scott pulse waves his whole team and hits them all. This not only KOs Scott’s Sinestro Corps. Ring (We didn’t pay enough attention to that.) but also brings out his Destroyer on click 3. I see another opportunity for big points. Ka-Zar now moves up carrying Scott Porter (Black Shirt) and Kingmonger. This lets Wendigo move four squares carrying Blackheart and lets Kingmonger swap into Iron Inquisitor so he can perplex Wendiigo’s attack and give him prob. He then charge/flurries The Destroyer whilst carrying Blackheart hitting both attacks for four damage each time KOing him. Tri-Sentinel then sidesteps to reposition Scott Porter (White Shirt) and Scott Porter (Black Shirt) makes a free barrier next to his two Scotts. Tri-Sentinel Punches the barrier to KO Black Shirt and put White Shirt on his STOP click. This is where I noticed while rewatching the match for this tournament report that I generated a Cowboy Boot construct, which I couldn’t do because when Scott pulse waved Genesis he hit her to her STOP click KOing his Sinestro Corps. Ring. I want to sincerely apologize for this as I shouldn’t have been able to KO his Scott Porter (White Shirt).
Turn 4: He flips Ace Of Pentacles. Apoc phases to attack Tri-Sentinel and Scott Porter (White Shirt) ultimately missing. Genesis flurries both Tri-Sentinel and the Cowboy Boot, KOing them both. Mister Sinister uses running shot to shoot Wendigo but misses. Nekron repositions because he can’t KO anyone and he ends his turn. Time is then called and I’m massively up on points so the game ends. I won 300-60.
I want to thank you for reading this tournament report and hope I was able to share some tech that will be able to help you in future games. I hope to see you dear readers at the next Majestix Invitational.